Showing posts with label New Year. Show all posts

Saturday, 13 January 2024

The same applies …

to this recipe as with the last, it's as old as the hills and never fails – even guests who don't “do tuna” hoover these morsels!


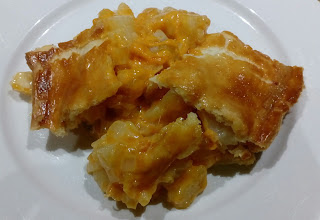
Tuna and Parsley rolls


200g/7oz tin tuna in oil

1 onion, chopped

100g/4oz cheddar cheese, grated

2 tbsp chopped flat leaf parsley

salt and black pepper

*1 tsp wholegrain mustard

1 puff pastry sheet

1 egg, beaten

1 tbsp poppy or Nigella seeds


Pre-heat oven 180fan/200c/Gas 6

Drain the tuna, reserving 1 tbsp of the oil. Pour the oil into a pan and cook the onion for 5 minutes until softened. Remove from the heat and stir in the tuna, cheese, parsley, seasoning and mustard until well combined. Allow to cool.

Roll out your pastry sheet and cut in half lengthways.

Divide the filling between the two rectangles, laying it in strips down the centre of the pastry.

Brush one edge with beaten egg and carefully roll up to create two long tubes. Cut each into 12 rolls. Brush with egg and place on a baking tray, seam side down. Sprinkle over with poppy or Nigella seeds and bake for 15-20 minutes. Serve hot or cold.

*I use Dijon mustard and add a dessertspoon – whichever you prefer.

Yum!


Here's a tip … if you've not already got a “go to” stash of recipes (on your laptop or wherever) that you'll use any time of the year then now is the time to start one and begin with these two recipes – you could call it “go to”!

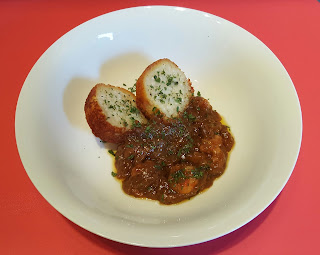
Now it's back to the economical – but tasty … and a New Year


Saturday, 6 January 2024

The healthy option – paté number 3

If you fancy a fish alternative then paté number 3 is for you – healthy and virtuous.


Smoked Mackerel Paté


250g smoked mackerel


250g quark (it's a soft cheese made from skimmed milk

not nice on its own but great as a low fat product for healthy pate!)


Glug of lemon juice


Black pepper


Two tsps of creamed horseradish


To garnish – parsley, finely diced

sweet onion or finely chopped capers


Remove the skin from the mackerel, flake it and pop into your food processor. Add the quark and blitz with the mackerel, then add the lemon juice, black pepper and horseradish, blitz again. You can gauge the consistency of the paté to your personal taste – but it needs to be fairly stiff for piping.

Fridge until you're ready to pipe - then garnish with a little dried parsley, or sweet onion or chopped capers.

Any leftovers can be served with anything you like, toasted bread, rice cakes or add to warmed pitta slit, with salad. Add to cooked pasta, hot or cold – perfect for lunch on the run!

If you can't get hold of quark you can use cottage cheese - low fat of course.


You'd never know it was healthy!

Finally, the best savoury biscuits ever ...


Saturday, 7 January 2023

Rummage pie – photo guide

I know I shouldn't blow my own trumpet but it tasted as good as it looked.


What's not to love.

P.s. You don't have to stick to the exact “recipe” for the cheese, it's just what you've got in the fridge that needs using up – but note that it's hard cheeses suitable for grating.

If you wanted an alternative pie filling and have been stashing leftovers in your freezer from the holidays combine 150g each of cooked gammon and turkey and add either a Sauce Supreme if you've got the time or an Alfredo sauce if you haven't – failing that a Campbell's condensed mushroom or chicken soup – if you've a drop of double cream left over add it to the soup.

Check out the Sauce Label on the blog for the Sauce Supreme recipe – under “More entertaining – The method in the madness and after the weekend” and for Alfredo sauce under “Or there's an alternative”.

Easy Peasy!


Time for a rummage!

Back to normal!

We all get to a point where there is nothing left in the tank and totally devoid of any inspiration.

It's time for a rummage – in the fridge and the freezer! I'm sure I've got a shortcrust pastry sheet in the freezer - it's a start. Hmm, the fridge - an odd onion here and the remnants of cheese I've always got in my fridge, particularly after Christmas and the New Year – yippee, the usual suspects are there - Gruyere, Mature Cheddar and Red Leicester - I think we're getting there, then there's the ever faithful baked jacket potatoes I didn't use. I can feel a pie coming on!

Hmm I know this is probably sounding predictable and you'd be right. Experience has taught me that when it's a horrible grey and cool day there's nothing like a pie, especially when it's cheating using a ready-made sheet and easy - whether it's with shortcrust or puff.

Here's my thrown together recipe :


Rummage Pie – Serves 4


300g grated hard cheese, mixed – whatever

is in your fridge – 125g Mature Cheddar, 125g Red

Leicester and 50g Gruyere

1 medium onion, finely diced and softened

with a knob of unsalted butter until opaque

1 tsp Dijon mustard

4 medium jacked potatoes, baked, peeled and

cut into small cubes

black pepper

1 shortcrust pastry sheet – 320g

1 egg, beaten


To assemble :

Make sure you take your pastry out of the fridge to allow it to “warm up” - you'll find the pastry is easier to use and won't crack. Line your pie dish with half the sheet – you may need to roll it a little to fit – for guidance my pie dish measured 27x9x5 cms approximately.

Tip the cubed potatoes into a large mixing bowl, season with black pepper. Add the mustard to the softened onion and then mix with the potatoes. Add the grated cheese and your filling is ready for the pie dish. Add your pastry lid, egg wash and fridge until you're ready to bake. Don't discard the beaten egg. Pre-heat your oven 180fan/200c/Gas6, egg wash the pie again and bake for 30 minutes until golden brown.


Note to self – may be add both the shortcrust and the puff pastry sheets to the emergency kit for the freezer – sounds like a plan!

Photo guide up next.

Saturday, 8 January 2022

Editor's January Pick #5: Italian/Malaysian Fusion?

Editor's note: My first introduction to arancini was from MiamMiam, and having recently sampled an amazing curry from the very same source, never was my gob so smacked to rediscover this posting from way back in 2016 that marries the two together! It feels underwhelming to palm a reader off with 'just look at the photo!', but it does a dash decent job of showing off the combination of the crispness of the coated and fried rice and the perfection that is the Rendang curry. So, have a go!


Fancy …

Italian/Malaysian fusion?


Another suggestion for serving the arancini. If you think about it you generally eat rice with a curry … why not in a ball with a crispy shell?

Why not serve the rice ball with a rendang curry? You can cheat if you like a buy a ready-made paste and add it to coconut milk or, a sort of half way house, make your own but speedily.


Rendang Sauce


100 ml coconut cream

50ml water

3 tsp brown sugar

2 tsp curry powder

(I used mild)

1 tbsp kecap manis

(also known as sweet soy sauce)


Combine all the ingredients in a saucepan over a low heat and

serve. Can be made ahead and re-heated.


There's nothing wrong with a short cut or two – it may not appeal to the purists out there – some of us haven't got time!

The world is definitely your lobster – you can add prawns or chicken, whatever you fancy. Just in case you think I'm making this stuff up – here's what it looks like, with prawns in the rendang sauce :


Happy New Year!


Saturday, 1 January 2022

Editor's January Pick #4: - Side for your Salads: Chickpeas

Editor's note: This post ticks a number of boxes right now - healthy, quick, filling, cheap, and there's a massive probability that like me, you'll have a tin of chickpeas on hand! Good as either a snack or part of a main, it couldn't be simpler! I recently made a vegan Thai curry and followed this recipe before I added the chickpeas to the sauce and it was a winner. Versatile!


Side for your “Salads”

Did you think that chickpeas (aka garbanzo beans) were just used as an ingredient in hummus – think again!


Cheeky Chickpeas!


1 x 400g tin of chickpeas

2 tbsp olive oil

salt


Pre-heat your oven 210fan/230c/Gas 8

Drain the chickpeas and rinse. Lay the chickpeas on kitchen roll and pat dry.

Place the chickpeas in a bowl and toss them in the oil. Season with salt. ** Add optional spices.

Spread the chickpeas on a non-stick baking tray and bake for 30 minutes – shake gently after 15 minutes – check again after a further 10 minutes – the chickpeas should be golden brown – note to self, do not walk away! Ovens vary as do the size of the actual chickpeas and you do not want them to burn and spoil.

Check out these photographs.


If you like spice you could mix together a pinch of chilli, sweet paprika and garlic powders or any spice you like – sumac would work well. Sprinkle the spices over the chickpeas and mix well at ** above.

You could use them as texture to top a salad – warm or cold – or just munch away from the bowl – I warn you they are moreish!


Editor's January Pick #2 - The back catalogue – what to do with the Asian Plum Sauce

Editor's note: Well, I can't say I'm surprised - I think I'm being original and then find out that there's a MiamMiam blog post that beat me to it. When I picked the plum sauce post all the way back from 2017 I hadn't stumbled onto the follow-up that talked about adding to chicken or Quorn. I didn't want to leave this out as there's a brilliant tip about thickening sauces using something that again - I read about here first!


The back catalogue – what to do with the Asian Plum Sauce

I know it's not rocket science – but the sauce screams stir fry so here it is :


Serves 2

300g chicken fillet, cut into thin strips

Use quorn fillet for a veggie option

1 dessertspoon of rapeseed oil

200g of julienne veggies – of your choice

spring onions, finely chopped

carrots

sweet peppers

sweetheart cabbage


1 tsp ginger

100ml of plum sauce

40g of cashews – chopped

1 tbsp soy sauce


Serve with a side of kecap manis – aka sweet soy sauce


Before we begin – just in case you're not sure – julienne is a term that means your veggies should be cut into short thin strips – 1/8” wide if you want to be specific! You could use your trusted julienne peeler – that way you're certain to get a uniform “strip”.

Heat the oil in a wok or large frying pan on high, add the chicken and stir fry for 3 minutes or until golden. Transfer to a heatproof bowl.

Stir fry the veggies in the oil and ginger for 2/3 minutes, add the chicken and the plum sauce, cashews and soy and stir fry for a further 2 minutes until the sauce thickens.

You can serve with rice or noodles, in either case they should be cooked and ready to serve. Place a portion in each bowl and then top with the stir fry.

Two notes :

If you've made your own plum sauce you may find it's a tad thin. You can thicken it, ahead, with arrowroot then set aside. Arrowroot thickens well – it also gives you a glossy shine and it has no taste so will not interfere with your sauce. Mix 1tsp with a drop of water, heat 100ml of sauce and then gradually add the arrowroot to thicken. Ready to use.

If you've not made your own sauce you could of course buy a ready made version!

Your julienne veggies are available in the supermarket so if you're feeling lazy then you can buy them ready to use. You might want to check – without being too finicky – that they are all of a similar size.

Next up … a treat that's not in the back catalogue - other than it contains damsons - so it qualifies!

Editor's January Picks #1 - Plum Sauce

Editor's note: The festive period came and went, hopefully with good times had by all. For a taste of something different I trawled around the blog and found this fantastic recipe for making your own plum sauce. A lot of us try to start the New Year with a healthy outlook, so what could be better than foregoing the takeaway and making yourself a delicious sauce to add to your healthy January menus!


The last kilo …

I have all sorts of ideas floating around - one in particular uses a classic Asian plum sauce, traditionally served with duck.

So, using 400g, here it is :


Asian plum sauce


400g plums, stoned and quartered

50g demerara sugar

75ml (3fl oz) white wine vinegar

pinch of chilli flakes

1 whole star anise or ½ tsp of ground star anise


Cook for 20/25 minutes until the plums are soft. Leave to cool and then pass through a sieve – reserve the sauce. The recipe will give you 200ml of sauce. I have frozen it.

Here are two photos – the beginning and the end, before passing through a sieve.


How luscious does it look?!

Moving swiftly on, I now have 600g of plums left so I'm going to “open freeze” the plums – like I did previously in “Share the spoils” it's always helpful to include a method.


Open freezing plums/damson plums


Wash them and pat dry. Halve the plums and remove the stones. Place them on a shallow tray – try and make sure they aren't touching and then place in the freezer. Leave them overnight – you'll then finish up with perfect frozen plums, to use whenever the mood takes. Bag the frozen beauties and pat yourself on the back.

It's so satisfying.

You do realise that I'm going to bore the pants off you with all sorts of recipes using plums and damsons for the foreseeable future!


Sunday, 26 December 2021

Editor's December Pick #16 - Back to the dessert!

Editor's note: If you want a summary on why this dessert is worth a whirl, then fast-forward to the end of this post for a photo of the finished article. Once you've seen it, whizz straight back to the top for the ingredients. Like a lot of the editors picks, the important information is in the hints and tips that came separately, so after the post you'll find a link to the MiamMiam method - absolutely indispensable. An excellent choice for New Year!


Back to the dessert!

This is definitely decadent and not chocolate. The recipe comes from the Vegetarian Society Cookery School. Before you close down and run – it's called Biscoff and Salted Caramel Cheesecake – interested?

I've been a member of the Vegetarian Society for decades. I get seasonal magazines which are brilliant, full of information and ideas. You don't have to be a vegetarian or vegan for that matter – it's all knowledge! When I received the Summer/Autumn magazine I was intrigued to read about their “Online Cookery Classes” - you could choose Easy Veggie Favourites (Part 1) or a Vegan version. For £15 you get six months' unlimited access to video content. You're also able to download and keep the recipes plus other stuff too.

It seems like a good deal for £15 plus the fact I saw two recipes advertised that I really liked the look of. Cheesy Lattice Pie and Biscoff and Salted Caramel Cheesecake.

I'm always telling you not to try a recipe for the first time when you're under pressure - you've no idea how accurate the recipe is and whether it needs tweaking – into the unknown! My Christmas is going to be very strange and quiet this year so I'm road testing this cheesecake now, ignoring all my own rules, so that if you fancy having a go it might be an idea for New Year?

What follows is the verbatim recipe and method – I'll add my tweaks and hints and tips with the method. It might look long winded but the upside here is you can spread the tasks and the elements aren't difficult.

Here goes :


Biscoff and Salted Caramel Cheesecake

Serves 10


Preparation – 30 mins plus 1½ hours setting time

Cooking – 20 minutes


You will need an 8” deep spring-clip or loose bottom

cake tin


For the base


150g oat biscuits

125g Biscoff Lotus biscuits

125g butter, melted

large pinch of salt


For the filling


500g plain full fat soft cheese

300ml double cream

100g icing sugar, sifted

3 tbsp Biscoff crunchy spread

2 tsp of vanilla extract


For the sauce


200g golden caster sugar

60g butter

125ml double cream

1 tsp vanilla extract

1½ tsp salt


For the topping


80g Biscoff Lotus biscuits


Method and tips are to be found here - http://www.miammiamcookery.com/2020/12/biscoff-and-salted-caramel-cheesecake.html


Saturday, 26 June 2021

New Year in July – shop-bought bread ideas …

Stating the obvious, there are a wide variety of naan breads available. For those of us who like a lighter alternative, flatbreads like the roti or chapati are a great choice, warmed, you can also use them as a scoop or a wrap. Check out Piadina – shop-bought small flatbreads, they are ideal to hold in one hand, fill, fold and enjoy for a fast fix. They are perfect for smaller appetites and for those with little fingers too!

You don't have to stick to Indian style breads, for example, Aldi sell a black olive ciabatta which is fab – 300g for 89p so doesn't break the bank, in fact an absolute bargain.

My other thoughts :

Sourdough

Focaccia with Rosemary

Baguette


You could even make some garlic butter and

make a retro garlic baguette


Mix and match!

I think that just about covers it for your New Year in July bash – three mains with roast potatoes, sides, rice and breads – all that remains is for me to wish you Happy New Year in July!

Now it's time to catch up on all those bits and pieces that have been on the back burner – remember the “sweet treats trio” I was sending out to my taste testers? Verdict up next …


New Year in July – more bread ideas

The second of my “make your own” bread ideas is pide. I mentioned it this time last year, as part of the “Back catalogue” series. A quick reminder - “Pide” (pronounced pee-day) is a Turkish bread that uses semolina – a perfect addition to the “dive-in” type of New Year bash we're planning here.

Don't be scared – this is not difficult. All you have to plan is when you're going to be around the house in a morning or an afternoon, to be able to complete the stages, none of which are long winded, it's perfect to slot in around the chores you know you've got to tackle anyway so why not get home-made bread as a bonus!

Here goes :

You can choose whether you use the salt, oil and sesame seeds as a topping or roll in semolina and sprinkle with Nigella seeds before baking.


Pide

one sachet of easy-blend yeast – 7g

pinch of salt

700g plain white flour

plus extra

1 egg, beaten

100ml olive oil

400ml lukewarm water

2 tbsp semolina


30g sesame seeds and coarse sea salt

or

extra semolina and Nigella seeds to sprinkle


Put the flour into a large bowl and make a well in the centre. Pour in the yeast and the olive oil reserving a little to brush over the bread prior to proving, add the water.

Mix until the dough forms into a firm ball, leaving the sides of the bowl. Cover with a clean damp cloth and leave to rise in a warm place until doubled in size. 1 – 1½ hours.

Lightly flour two baking sheets.

Knock down the dough - divide into two, shape each into a round ball and then roll each in 1 tbsp of semolina . Roll out and shape into two ovals and place on the baking sheets. Brush with beaten egg, sprinkle with sea salt, the reserved oil and sesame seeds. Alternatively you can sprinkle with additional semolina and Nigella seeds. Leave to prove for 30 minutes in a warm place.

Pre-heat your oven 210c/190fan/Gas 7.

Make dimples all over the surface of the bread – use your index finger vertically into the bread and you'll achieve the same size.

Bake in a hot oven for 15-20 minutes until golden brown and when the base is tapped the bread sounds hollow.

From the recipe given you'll get two pide – 30x20cms or 12x8” in old money.

You don't have to be an accomplished bread maker – it's easy. There are variations on the theme of pide in Asia, the Middle East and Eastern Europe. In Turkey there are pide street food shops called “pideci”.

If you'd like to see what it looks like, check out the bread label on the blog. If you fancy having a go you can make the pide ahead and then freeze it. Defrosted and warmed it's excellent.

Now for the shop-bought bread ideas …

New Year in July – the bread ideas

Where to begin!

You can make your own or buy if you haven't got the time – there are so many quality breads now that it's difficult to choose.

Here are a couple of “make your own” ideas – roti flatbreads are always a hit. You may also know roti as chapati – it's a favourite with me because it's unleavened unlike, for example, naan which contains yeast. I'd much rather eat a curry or chilli with bread than rice which is probably why my mention of it was at the end of my ideas list!

Back to the roti - the recipe I always use comes from Mildred's cookery book, ever so slightly tweaked at the end.

Here's their recipe :

Garlic Roti


20g unsalted butter

3 garlic cloves, finely chopped (or paste)

½ tsp dried chilli flakes (or a pinch of powder)

200g self raising flour (plus extra for dusting)

50g wholemeal self raising flour

80-100ml water

vegetable oil


Warm the butter in a small saucepan over a low heat, add the garlic and chilli and cook, stirring, for a minute until the garlic begins to release its flavour but not coloured. Tip into a mixing bowl with the flours and gradually add the water, using a wooden spoon, until you have a moist (not sticky) dough. Knead the dough for a few minutes until smooth and then cover with a clean damp cloth and leave to rise for 30 minutes until nearly doubled in size.

Divide into 8 pieces and form into balls. Dust with a little flour and then roll into thin circles of about 5mm (¼ inch) thick. Use a heavy based frying pan - add a drop of vegetable oil to grease. Cook the rotis on a medium heat – one at a time for 2-3 minutes each side until puffed up and brown. Serve immediately or cover with a clean tea towel and reheat in a low oven when needed.

I made them ahead and then reheated before serving and my only addition was to finish them off with a brush of melted butter and a sprinkle of garlic salt.

Then there's pide ...


Saturday, 19 June 2021

The “sides” ideas continued …

speaking of raita. You can of course buy it ready-made in a pot or jar. Personally I've never seen the point – it's expensive and not that appetising. Here's my fast, faff free version which, hand on heart, is fab!

Raita

Take half a large pot of plain yogurt - 250g. Add one teaspoon of ready-made mint sauce and stir well. Add salt and black pepper. If you'd like to add finely diced cucumber feel free but add it as you serve so it remains crisp.

Another culinary marriage made in heaven – the easy way.

Conversely a good quality shop bought mango chutney is a side I would recommend investing in. There are quality versions and my favourite is Sharwood's Green Label. You can of course make your own but I've found that I can't do better.

The Posh Chilli needs a generous blob of sour cream together with rustic bread or even soft wraps if you prefer - “bread” ideas are on their way.

I haven't forgotten the rice, if that's your bag. You may be surprised when I suggest cheating and buy frozen. It takes minutes in the microwave and is excellent – the choice is endless – egg fried rice, pilau, with cauliflower and a variety of steam bags to name just a few. The other plus with buying frozen is that you can always cook more if you need it, very quickly – I think you've worked hard enough. I don't cook rice often and so one less grotty saucepan to wash up gets my vote. Of course you may have a fancy rice cooker!

Now for the bread …


More “sides” ideas ...

Are you a fan of the selection of relishes served with your poppadoms in your favourite Indian Restaurant? Many moons ago I was given a recipe for the onion relish. It has to be said that it's quite punchy and obviously you have to like onion – if you do it definitely hits the spot!

Here it is :

Onion Relish


2 medium onions, finely chopped -

weight 150g per onion approximately

salt and black pepper

2 tbsp fresh orange juice

1 tbsp lemon juice

1 tbsp tomato paste

pinch of chill powder


Place the onions in a large mixing bowl. Add the remaining ingredients and mix well.

Place the relish in sealed airtight containers and store in a cool place.

The secret to this relish is that you should not serve it for at least a day, preferably two, after making it. It's important that the orange and lemon juice and the tomato paste are allowed to “mature” - leaving it to infuse takes away any harshness from the onion and the tomato paste.

The combination of the Bombay Aloo and the Onion Relish balances so well with sweet mango chutney and refreshing raita … speaking of raita

P.s. Not connected at all to the New Year in July bash, if you are a lover of all things spicy then this onion relish is excellent with cold meats or, best of all, with a strong mature cheddar cheese.


New Year in July – the “sides” ideas to go with the mains

The sides for the Lamb Stew and the MWM fit both dishes – having said that all the sides that follow will be delicious for the Posh Chilli too.

Up first is a side dish that you could (and I do) eat as a stand-alone veggie meal adding a selection of other stuff – cauliflower and chick peas to name but two!

Bombay Aloo – aka Bombay Potatoes

500g of cooked potatoes – I use Charlottes – whatever you use it should be a waxy potato that holds its shape, so any new potato will be just the job.

1 medium onion, finely diced

1 tbsp rapeseed oil

250g passata

1 tbsp tomato paste

1 tsp caster sugar

1 tsp ginger paste or 1” fresh, grated.

2 cloves of roasted garlic or 2 cloves of fresh, crushed

1 tsp each of ground cumin, coriander, garam masala and curry powder. Use a curry powder that best suits your palate and how much heat you like – mild, medium or hot

1 tsp salt or to taste


Use a medium size saucepan (21cms/8”).

Your potatoes should be cut to approximately 6-12 cms/¼” to ½” pieces.

Fry the onions in the oil until soft – 3-4 minutes. Add the ginger, garlic, spices and salt. Fry so that the spices are released. Add the potatoes and the tomato paste, fry gently so that the potatoes absorb the flavours and the paste cooks too – 3-4 minutes.

Add the passata and sugar and cook on a gentle heat for 10 minutes. Taste the Bombay Aloo, adjust salt and sugar to personal taste. Cool, box and fridge. The longer you leave this dish the better it will be. It freezes well.

As a guide this recipe will give you 690g of scrumptious Bombay Aloo.

More sides ideas up next …


New Year in July - MWM curry - there's more …

and a few hints and tips.

If you want to serve the curry on the day you slow cook it then make it as early in the day as possible – the longer those aromats get to do their thing the better it'll be - set it aside in a cool place, in the slow cooker (covered of course) and then re-heat gently when required. If you want to spread your workload you could of course make it the day before and fridge it.

Alternatively if you cook this curry ahead in readiness for your bash or just for a Saturday night treat you can “box” it into portions to suit and freeze it – you shouldn't have to cook on a Saturday!

How to make the most of your time and effort. I've made this curry with half the amount of chicken fillet but with the quantity of sauce as the recipe states. I separated half the sauce and froze it to use at a later time. Thank you freezer – again.

You don't have to use chicken – as I've already mentioned use Quorn pieces for a veggie alternative or you could use fish or prawns.

You could just make the curry sauce on its own and freeze it – again, preferably in amounts that will suit you. Don't forget the curry flavours will continue to develop whilst frozen – it's a win win!

I just love being able to produce food, unflustered at any time, but especially in this case, for your New Year in July celebration.

In conclusion three “cook ahead and freeze” dishes for a New Year in July get together – all you have to do is take them out of the freezer – oh and decide on your choice of sides and they are coming up!

Saturday, 12 June 2021

New Year in July – Dish 3

Here's my final contribution for your New Year in July bash - a creamy chicken curry :

I first came across a version of this recipe years ago by Madhur Jaffrey, here's mine :


Dish 3 - Malai wali murghi

(aka MWM)

1.35kg/3lb chicken fillet, diced


*1½ tsp salt

*2 tsps cumin

*2 tsps coriander

*½ tsp turmeric

*½ tsp cayenne pepper


ground black pepper

6/7 garlic cloves or equivalent paste

2.5cm piece of fresh ginger, peeled

and chopped finely or equivalent paste


300ml water

6 tbsp vegetable oil

110g onion, chopped finely

175g passata


1 tsp garam masala


200ml double cream (heavy USA)

If you are using raw garlic and ginger then blitz them in a blender, add a drop or two of the water and blend until smooth. Alternatively mix both the garlic and ginger pastes together.

Mix the spices marked * above.

Using a large frying pan add the vegetable oil and heat. Seal the diced chicken on both sides and set aside in the slow cooker.

Fry the onion for 2/3 minutes and add black pepper. Add the garlic and ginger paste then the spices and fry for 2/3 minutes. Mix the passata with the remaining water and add to the mixture, bring to the boil and transfer to the slow cooker – cook for 2/3 hours.

15 minutes before the end of cooking time add the garam masala and the double cream to complete the dish.

If you prefer a vegetarian or vegan version you can use Quorn pieces. If you use Quorn pieces they take 12 minutes to cook from frozen. Cook the sauce on the hob for 30 minutes, adding the Quorn after 18 minutes, with the garam masala and cream at the same time, simmer for the remaining 12 minutes.

You'll not be disappointed – there's more …


New Year in July – Dish 2 – method and extras


Dish 2 – Posh Chilli

method

Seal the diced steak in batches in a large frying pan using a drop of rapeseed oil then set aside in your slow cooker.

Gently fry your onion and garlic, using another drop of rapeseed oil if necessary. Add the spices and cook together so that the spices are able to release their deliciousness!

Add the passata and the chilli sauce and bring to the boil. Add to the sealed diced steak and then slow cook for 4 hours. Turn off, leave to cool and then freeze.

Defrost thoroughly in your fridge. Re-heat gently on the stove adding your kidney beans, sweet baby peppers and/or chorizo.

the extras

Use a large frying pan and fry the chorizo gently so that it releases its oil. Set the chorizo aside, leaving the oil in the pan.

Sauté the sliced, sweet baby peppers in the chorizo oil.

If you enjoy a spicy hit you can use mixed beans in a chilli sauce instead of ordinary red kidney beans.

Serve with rice if you like but I think it's fab in a bowl with a blob of sour cream served with some rustic bread of your choice on the side or with wraps with bowls of relish of your choice – mango would work well.

Again, freezing serves dishes like chilli very well – the freezing process allows the spices to develop.

I've made this Posh Chilli recipe as part of a New Year supper party for my friends and family and it went down a storm – I'd like to bet it will become part of your lip smackingly good list!

My final contribution ...


New Year in July – Dish 2

This is, after all a celebration and calls for top notch food.

You might not think of chilli as “top notch” - what makes this chilli special, nay posh, is it uses diced steak and slow cooks it. The only remaining task is to add the red kidney beans and any garnishes. A word of warning – just in case you've forgotten – do not slow cook the kidney beans.


Dish 2 - Posh Chilli

Serves 4

500g diced steak

A glug of rapeseed oil

1 medium onion, finely chopped

2 cloves of roasted garlic paste or 2 cloves crushed

tsp = teaspoon

half tsp ground cumin

half tsp ground coriander

half tsp ground cinnamon

quarter to half tsp chilli powder (to taste, depends how much of a kick you like – I used a quarter tsp)

500g jar of passata

60ml sweet chilli sauce

390g can of red kidney beans, rinsed


optional extras :

150g small dice or sliced chorizo

sweet baby peppers, de-seeded and

finely sliced

Now for the method and the extras …


New Year in July!

If we can have Christmas Dinner in June then why not New Year in July! If you don't like either idea but want to celebrate, just not in the traditional way, then you might like the following ideas.

I realise I'm tempting fate when I mention that the weather could be warm in July – though even in warm weather we still like hot food.

There are three different dishes coming up – lamb, beef and chicken/veggie and they have one thing in common – they are all cooked in the slow cooker. You can make these dishes when you have time and freeze. All that then remains is to choose your sides.

Lets get this show on the road :

There's a recipe Aromatic Lamb Shank Stew in Nigella Bites which serves whole shanks and includes lentils, served with couscous – this is my version.


Dish 1 - Lamb Stew


4 tbsp rapeseed or vegetable oil

6 lamb shanks

2 onions, finely chopped

4 tsps garlic paste

sprinkle of salt

1 tbsp turmeric

1 tsp ground ginger

¼ tsp dried chilli flakes

2 tsps cinnamon

¼ tsp freshly grated nutmeg

black pepper

3 tbsps honey

1 tbsp soy sauce

3 tbsp Marsala


boiling water to cover


Using the oil, brown the shanks and place in your slow cooker. Fry the onion and garlic paste until soft, sprinkling with salt. Stir in the turmeric, ginger, chilli, cinnamon and nutmeg and season with pepper. Add the honey, soy and Marsala. Tip the mixture over the shanks and cover with boiling water. Leave for as long as you like. 4 to 6 hours. Remove the shanks and strip off the meat – add the meat back to the gravy in the slow cooker.

The lamb is ready to serve when you are, fridge until required. You can cook ahead and freeze if that's more convenient, it just gets better!

I serve this “stew” with the biggest pan of roasties I can. There's loads of spicy gravy and roast potatoes somehow fit. New potatoes would work well, just not as crunchy.

If you like the idea of a spicy roast “main” then this is for you, it's worth every second of prep and it's not complicated.

Then there's the posh chilli ...