Showing posts with label Weekend Luxury. Show all posts

Saturday, 8 January 2022

Editor's January Pick #6: Now I Have Your Attention.. Arancini!

Editor's note: Well if the previous pick was enough to pique your interest, it seems only right that the accompanying guide is presented along with it. I've noticed that some supermarkets have on occasion sold ready-made versions but I wouldn't want to taint something so downright tasty after having had the real deal. What follows is the first half of the recipe for making your own, with two links at the bottom on how to finish off the perfect arancini. The sections are fantastically split as you can follow the guide below to make the first part for the freezer, bring up the second guide to complete for the day before cooking, and the third to be used on the day!


My antidote …

to over-indulgence is simple tasty food and right about now we really begin to crave it, so here we have :


Arancini


For arancini, aka rice balls, you'll need a basic risotto recipe :


1 litre vegetable or chicken stock

40g unsalted butter

1 tbsp groundnut oil

2 small onions, finely chopped

3 garlic cloves (or 3 tsps paste)

350g risotto rice

150ml dry white wine

2 tbsps flat leaf parsley, finely chopped

100g Parmesan cheese, grated

salt and black pepper


Bring the stock to a boil and simmer gently. Heat the butter and the oil in a pan and fry the onions and garlic until soft. Season with salt. Stir in the rice and fry for 2 minutes until the edges become opaque. Add the wine. Start adding the stock, a ladle at a time – the liquid should be absorbed before you add the next. Add the parsley, black pepper and the Parmesan cheese.

It's imperative that your stock is kept hot and added a ladle at a time. If you follow these basic principles you'll be fine.

Tip your risotto into a tray bake, cover and cool, then fridge. You can leave for a couple of hours or overnight – whatever suits you best. The tray measures 12” or 31cms - with the tray bake lengthways in front of you cut the risotto in half. Each half tray ( 6” or 15.5cms) gives you 9 arancini weighing approximately 80/90gm approximately. Using one half divide into 9 squares – 2½” (6.5cms) 5” (13cms) and 7½” (19cms) and set aside. I used a good old fashioned school ruler – works a treat. You can continue and make another 9 or freeze the remaining risotto as it is.


Prepping this way will give you pretty much similar sized arancini but don't lose sleep over it!

You might think there appears to be a lot of work here but the recipe is simplicity itself and it can be made in stages, whenever you have time.

Happy New Year!

Editor's note: for part 2 of how to prepare the arancini follow this link

And for part 3 of how to finish it off on the day, follow this link.

Saturday, 6 February 2021

A sweet interlude – photos and hints and tips

Here's the first photo :

You'll see that the fudge has a marbled top, not spread evenly as the recipe states – it's personal choice, I prefer irregular shapes!

Here's my tip – the recipe says “line a 20cm square shallow tin ...”. dip a teaspoon into the melted chocolate and place a tiny blob in each corner of the tin and then glue the parchment so that it stays put.

Here's another … make sure you sift the icing sugar otherwise you'll finish up with tiny white spots in the fudge.

Here's another – I turned the fudge into a chocolate orange version by adding 2 tsps of Valencian Orange Extract to the condensed milk and melted chocolate.

Here's the second photo :


Here's another … to remove the slab of fudge use an ordinary fish slice. Gently ease the slice along each edge of the tin and then tip it upside down. If the slab of fudge won't comply do not lose your temper just repeat with the slice and it will surrender!

Here's the third photo :

Cut your fudge into squares – the size of the square is up to you. The recipe states you'll get 50. They'll be large. I cut the slab in half and then each half gave me 36 pieces approximately 2x2cms – a total of 74 pieces. My tin has curved corners so I straighten each edge so that all the squares are exactly that, no “curved squares” if you get my drift!

Place the squares of fudge onto kitchen roll to dust with cocoa and leave space between each square for even coverage. Use a tea strainer or a small sieve, tapping the edge gently to dust.

Here's the final photo :

Boxed up, ready to hand round to the

members of your bubble or you can box in small

amounts and freeze

Enjoy!

Now for the return of the rant ...

Wednesday, 23 December 2020

Fingers crossed it works ...

It does – eureka!


Take your time and gently does it


To ease the cheesecake from the base use a

palette knife, gently and slide it on to the cling

film – the base is set firm, especially if you've

used a tamper. Sprinkle the additional 80g of

crushed biscuit topping over the cheesecake 


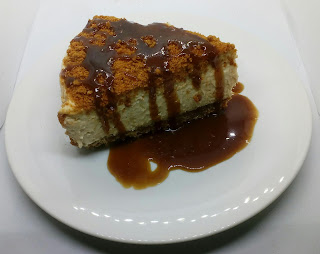
salted caramel sauce – made ahead

at a time that suits you – all that remains is to cut

a slice and drizzle


Here it is in all its glory!


Now for a doorstep delivery and a taste test ...


The cheesecake filling and another piece of kit!

You'll need two medium mixing bowls – one for the soft cheese and Biscoff spread and another for the cream, vanilla essence or bean paste and icing sugar.

Here's the cheese and biscoff spread – you'll

find life easier if you add the spread to the cheese and

mix gently by hand, then continue with the electric hand mixer


Sift the icing sugar directly into your other mixing bowl (with

your scales set to zero, through a sieve) whisk in the

measured cream and the vanilla, gradually, then use the

electric hand mixer until you have firm peaks


Gradually fold in the cream mixture to the cheese and spread

mixture – I used a spatula


Here it is – ready for the fridge

The piece of kit you're looking for is a vase – the one I used measures 12cms/5” in diameter x 20cms/8” high – upside down.


It's not easy to photograph but you get

the idea!


Here's why I used the vase


Fingers crossed it works!


Time to get cooking and the photos!

After the miserable news at the weekend spoiling plans for Christmas I'm glad I decided to crack on with the cheesecake. It's not much I know but a distraction creating a delicious dessert – she says hopefully, might help.

Here goes with the photo guide :

I always prep the liners ahead, it's a

fiddly job but well worth the effort, ready to grease

and secure with unsalted butter


It's so much easier decanting the biscuits

in a bag, ready to crush and crumb with your

rolling pin


Ta dah – no mess and easy to see the texture


My trusted tamper – the perfect piece of kit

to press down the biscuit base in the tin


Coming next – the filling and another piece of kit!


Saturday, 21 November 2020

The real deal – a photo guide


thinly sliced potatoes – I used Charlottes


rinsed thoroughly and dried in a clean

tea towel


prepped and ready for the oven


out of the oven, ready to roll!

Next – brown paper packages tied up with string …

The real deal – gratin dauphinois

450g/1lb waxy potatoes – peeled and sliced

no thicker than a two penny piece


300ml/10fl oz/½ pint of double cream


unsalted butter for greasing your dish

knobs of unsalted butter to scatter over the

completed gratin – a 30g slice divided into six


2 cloves of roasted garlic


celery salt and black pepper to season

Pre-heat the oven 130f/150c/Gas 2.

Rinse the potatoes thoroughly in cold water, shake them dry in a clean tea towel. Grease the baking dish generously with unsalted butter and add the garlic.

Layer the potatoes in your dish, season well, pour over the cream and then add the knobs of butter.

Bake in the oven for 1½ hours. Set your timer for 1 hour 20 minutes – for the remaining 10 minutes turn the oven up to high for a golden crust.

Hints and tips and kitchen kit up next ...